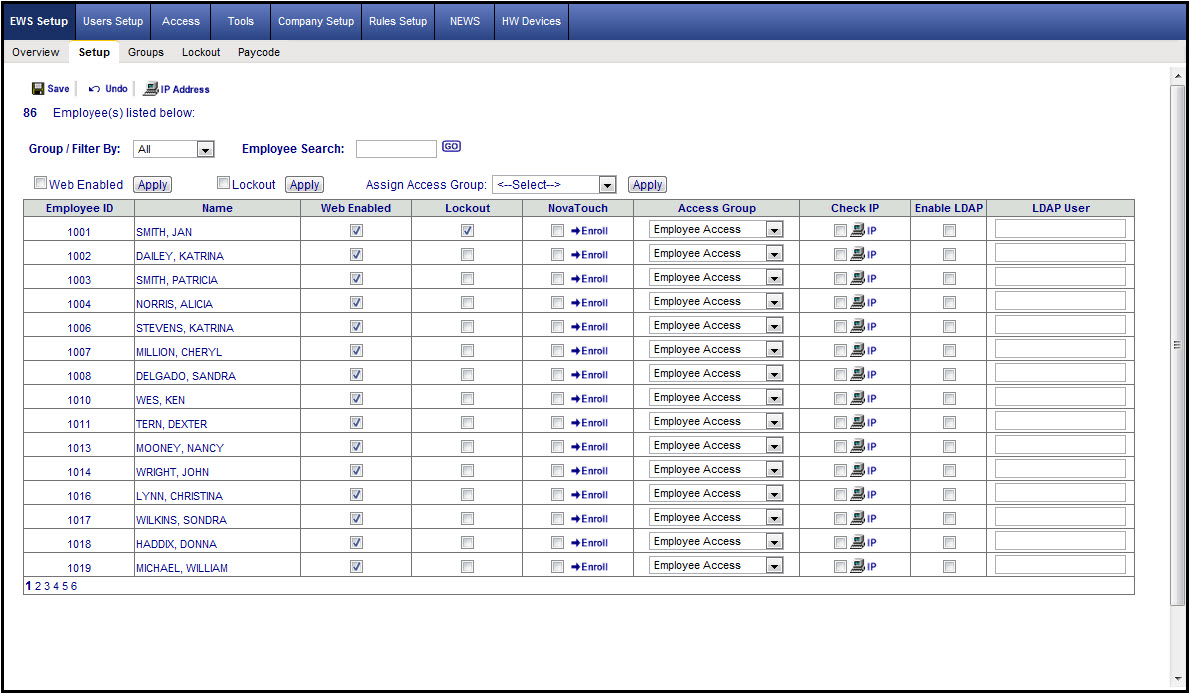
The Setup page is primarily used during implementation to enable employees' use of EWS and their assigned security access group (continued below).
The Setup page is primarily used during implementation to enable employees' use of Employee Web Services (EWS) and to assign employees to security access groups. It can also be used to activate punch lockouts, to enable public IP address restrictions, and to activate and enroll employees to use the NOVAtouch-II fingerprint reader with EWS. It is important to note again that the only time this area needs to be used is during initial implementation, when employees are using the NOVAtouch-II fingerprint reader, or when restricting employees to computers based on selected public IP addresses.
Group/Filter By
This allows the system to locate and display only employees who are assigned to the selected labor group level (can be more than 1 page of employees). It is important to note that all the "Apply" buttons on the page will apply the related change to all employees who are part of the filter—not just the 15 that are displayed on the page. If there is more than 1 page, simply click on a page number (displayed in the lower-left area of the page) and the system will bring up the employees associated with the selected page.
Employee Search
With the “Group/Filter By” field set to “All,” the “Employee Search” field allows partial or full entry of either the employee ID or Name. This field is a partial-string search field, which means it will search the ID or Name (first or last) fields for the entered information. Once you have made an entry in the field, click Go. A field will appear next to the Go button showing the number of employees that met the search criteria. Click on the right or left arrows to scroll through the employees that the search found. Note: This is not a record filter; it is a search. As each employee is located, a red arrow will appear next to their name.
Web Enabled
Lockout
Assign Access Group
Page Columns
Employee ID: Employee ID number
Name: Employee’s full name
EWS: When selected, the employee has access to Employee Web Services (EWS). See also "Access Group."
Lockout: When selected, the employee will NOT be able to punch IN/OUT outside of their schedule when using EWS.
NOVAtouch: When selected, the system will allow the employee to be enrolled to use the NOVAtouch-II fingerprint reader when using EWS. Please click on the following link for detailed enrollment instructions: NOVAtouch-II (PDF)
Access Group: Select from the dropdown list the Access Group to which the employee will be assigned. This is how the system knows what features and what kind of access the employee is allowed when using EWS.
Check IP: When selected, a list of valid IP addresses that were created (refer to "IP Address" below) will be listed for selection for that employee. The employee will be limited to using any computer based on the selected IP addresses. If this column is selected but no IP address is selected, upon save the system will automatically deselect the column. Note: At this time the IP restriction is for all EWS login pages and functions. When employees are allowed to punch IN/OUT in the office and NOT at home, restricting their IP address means that even the kiosk features will not be available at home. Please click on the following link for detailed IP Address creation and assignment instructions: IP-Address Security (PDF)
IP Address ![]()
The system can restrict access to the program to valid customer locations, preventing system access when required. When planning to limit employees in this way, keep in mind that this feature is used to configure all of the possible “public” IP addresses that are associated with a customer’s business locations. The “IP Address” button is used to create all the possible IP addresses that can be assigned to employee and system users. Please click on the following link for detailed IP Address creation and assignment instructions: IP-Address Security (PDF)